Wednesday, June 20, 2012
Wednesday, January 25, 2012
DIY Playdough- The Best Playdough Recipe
Hello Everyone! Today I have a great activity that will keep the kids busy for hours....Playdough! This a great recipe that makes playdough that can last up to 6 months! So much fun! Here's what you will need:
1 Cup Flour
1 Cup Water
1/4 Cup Salt
1 TB Vegetable Oil
1 TS Cream of Tarter
Food Coloring
Glitter (If you're a FUN mom, lol)
First, Mix all of your ingredients together in a pot, in any order.
(I've done this many times, and it doesn't matter which order you add the ingredients.)

Once the mixture is mostly clump free, Heat on Medium heat.
Stir continuously....After several minutes, the playdough will form into one big clump around your spoon.
 Once it is all clumped into one big blob, remove from heat and knead by hand...my FAVORITE part!
That's it!
Store in plastic container or baggie for up to 6 months! Have fun! This is the perfect activity for rainy days! Give your kids some cookie cutters and a rolling pin, and they will be busy for hours!
This playdough is non-toxic and even edible, although I don't recommend it. Try it out! You will never need to buy playdough at the store again!

1 Cup Flour
1 Cup Water
1/4 Cup Salt
1 TB Vegetable Oil
1 TS Cream of Tarter
Food Coloring
Glitter (If you're a FUN mom, lol)
First, Mix all of your ingredients together in a pot, in any order.
(I've done this many times, and it doesn't matter which order you add the ingredients.)

Once the mixture is mostly clump free, Heat on Medium heat.
Stir continuously....After several minutes, the playdough will form into one big clump around your spoon.

That's it!
Store in plastic container or baggie for up to 6 months! Have fun! This is the perfect activity for rainy days! Give your kids some cookie cutters and a rolling pin, and they will be busy for hours!
This playdough is non-toxic and even edible, although I don't recommend it. Try it out! You will never need to buy playdough at the store again!

Monday, January 23, 2012
DIY Candy Jars
Hi guys! Today I’m back with a great craft that is super easy and can be used at your parties! These are also great to make for teacher gifts! OK, Let’s get started. Here’s what you’ll need:
 -Spray Paint (color of your choice)
-Glass Candle Holder


-Glass Candle Holder
-Glue Gun
-Glass jar with lid
-Ribbon
-Goo Gone (purchased at Dollar Tree)
First, start by removing all stickers from your jar. Any type of jar will do…Salsa, Pasta Sauce, Peanut Butter, ETC. Then, spray paint the candle stick and the lid to your jar. Spray several coats and let dry completely. Now glue your jar to the top of the candle holder. Now decorate to your heart’s content! Remember have fun, and be creative! Ta Da!

Saturday, January 14, 2012
DIY Sleepover Cake- Sleepover Party
Hi Guys! Today I'm back with one of the most delicious parts of the party...the CAKE! This is a great cake that anyone could make! No special skills required! To stay with our Sleepover theme, we are going to make a cake that looks like girls sleeping in a bed! Perfect!
For this cake, you will need:
one box of Cake mix (plus the ingredients),
Vanilla Wafers, Bubble Tape Gum, Frosting and Twinkies.
First follow the directions on you cake mix box. Bake your cake in a rectangular shaped cake pan. After the cake has cooled, place 4 Twinkies in the center. Make sure they are all touching. Then frost the cake completely, covering the Twinkies as well. (Tip: Freeze the Twinkies before frosting, it will be a little easier.) Next, place one Vanilla Wafer above each Twinkie.(This will be the face.) Now use the Bubble Tape to create the blanket.(Picture Below). Lastly, use frosting to make hair and faces on cookies! That's it! This cake was a lot of fun to make, and
the kids loved it! Why don't you try it?

Friday, January 13, 2012
DIY Sleepover Activities and Games
Hey everyone! Another great party favorite is a Sleepover! All kids love to have a group of their friends over for an entire night of celebration! Planned activities are a must for this type of party! Because of the amount of time that you will have your guests, you should have some idea of what you want everyone to be doing...besides destroying your house and keeping you up well past your bedtime, lol! There are a ton of activities that will keep the kids attention, and not have everyone running amuck! A great ice breaker game is called 2 Truths, 1 Lie. Each guest writes down 2 Truths about themselves, and 1 Lie. Then each guest reads all 3 descriptions aloud, and everyone else guesses which one is a lie. This game helps to introduce everyone a little better, in case not everyone knows each other.
Another great game to play in the dark is Flashlight Tag! Ask each guest to bring a flashlight, and let them run around in the backyard! This kept the girls at our party busy for over an hour! I kept refreshing their pallets with refreshments, and they ran around laughing and screaming! Great time!
Mani/Pedis are another fun activity that everyone will love! Let the girls paint their own, or each others, fingers and toes! The more colors the better! Encourage the girls to make designs and be creative! In case of any mishaps, have a bottle of nail polish remover nearby! I even found these adorable pedicure sets at the dollar store! The set included slippers,
toe separators and an emery board! All that for a dollar? Can't beat it!

Another great game is Spoons! This is a fast paced card game that everyone can play! If you get 4 of a kind, then Grab a Spoon! If you see someone else grab a spoon, grab a spoon too.
Preparation: A deck of cards and Spoons
*The number of spoons that you’ll need depends on how many people are playing. You’ll need to have one less spoon than the number of people playing in the game- e.g. 9 spoons for 10 players
How to Play: Have everyone sit in a circle, with all spoons in the center.Deal 4 cards to each player and put the remaining cards in a pile next to you. Have everyone look at their cards.
Basics:Everyone's goal to get 4 of a kind...if you do, Grab a Spoon! Once someone goes for a spoon, everyone else should too! Because the person left without a spoon is OUT! Then deal them out again! Lots of fun!
One of my oldest daughter's favorites is the Toilet Paper Game! Have your camera ready for this one! You're sure to take some great shots! You will need an even amount of players. Have the guests partner up. Give each team 1 roll of toilet paper and 1 roll of tape. Give each team about 10 minutes to wrap the best mummy! Give them specific details like neatness, or craziest, and then have them present to you why their mummy is the best! You could even add accessories like hats and scarves for them to wear! The judge will pick a winner, and then the partners can switch!
*FYI: Buy the cheap toilet paper! Another great dollar store find!
Hope you play some of these great games!
They are sure to be a hit at your next sleepover!
Be back tomorrow with an awesome DIY Sleepover cake and fabulous breakfast for your little morning guests!
Wednesday, January 11, 2012
DIY Games and Activities- Carnival Party
Today I'm back to talk about some easy games and activities that you can create from items around your house! There are so many useful items lying around our homes, that are the perfect supplies for great games and activities! Party guests, depending on the age, need to be entertained while at the party...so let's do it! A great activity for younger party guests is stored right in your pantry. Grab some different types of pasta, such as Penne or Rigatoni. Then get some string or yarn and let the kids make their own macaroni necklaces or bracelets to take home! If you have any dry beans, these are great for creating beautiful art. Give each child some paper and a bottle of glue, and let them create a picture with different color beans!
 Another favorite of mine is Rice Art! This is so much fun, and so easy to do! You will need Rice, Vinegar, Food Coloring, Baggies and Wax/Parchment Paper.
 Depending on how many colors you would like to make, Put one cup of Rice in a Baggie. Pour in 1-2 T of Vinegar + 5-7 drops of one coloring, depending on what you want the color to be. Close the baggie and get as much air out as you can. Squish the Vinegar mixture throughout the Rice until it has reached the right shade. Dump the Rice onto a sheet of parchment paper until dry! You're done! Let the kids make some fabulous take home art! Make a variety of colors for more fun! So simple, and So cheap!
 Another great game often played at the carnival is Ball Toss! This is another very simple game that can be made at home. For my daughter's party, we made a Ball Toss simply from Solo Plastic cups and a small ball!You will need: Plastic Cups, small ball, Paper Box Lid, Hot Glue Gun. I used the lid of of a paper box to line my cups up in. I hot glued the bottom of each cup onto the inside of the lid. And Voila! Done! For older children you can color the inside of several cups for a harder shot, or use a ping pong ball that has more of a bounce!
 Facepainting is another great activity to keep all of your party guests busy! Don't be afraid to do this yourself. Face paint can be bought at any craft or costume store. You can practice your designs prior to guests arriving, and even make a small display board to show the kids which designs they may choose from. If your not very artistic, stick with the basics like: hearts, stars, rainbows, etc.
 This next game is great for kids about 7 and older. The kids at my daughter's party loved it so much, they requested to play it over and over again!
All you need is shaving cream, plastic shower caps and cheetos (go with the cheap ones, because no one will want to eat these!) Each party guest will need to partner up. One partner wears the shower cap and the other has a stash of cheetos! Squirt a large dallop of shaving cream on each guest with a shower cap. Have the partners stand several feet away from each other. The object of this game is to get the most cheetos stuck to your partner's head of shaving cream in 60 seconds. The kids will be having so much fun, they won't be able to stop laughing! A great hit!

Be back tomorrow with some more great ideas! Please feel free to leave any comments or suggestions!
Saturday, January 7, 2012
Carnival/ Circus Party
My next party idea is great for both boys and girls of any age! Everyone loves a great afternoon at the Carnival! This theme is the perfect time to let your imagination soar and create a memorable bash! Just think about all of your favorite things to do at the Carnival! My first thoughts were the bright array of colors, the great food, the many beautiful balloons, and of course, the fun, prize winning games! Depending on the age of the children attending, you can make the games at your party harder or easier. This party theme was just used for my daughter's 7th birthday! It was great, and all of the kids really enjoyed themselves! We transformed my back porch and yard into a beautiful carnival! My first thought was to pull my 12x12' popup beach cover from the garage, and set it up in the backyard. We decided to decorate the inside and edges around the tent cover with colorful crepe paper. This really made it feel as though you were at the carnival/circus! I also blew up some balloons and tied to each corner!
 After decorating the tent, my next thought was food! My favorite snacks to eat at the carnival are corndogs, cotton candy, popcorn, candy apples and funnel cakes! Lots of great sweets to choose from! Most of which can be made a home for a fraction of the price! Let's make some Carnival party snacks!
Corn Dogs aka (Pigs in a Blanket) (32-48 servings)
Crescent Rolls (2-3 rolls, Depending on many you need to make)
Hot Dogs (2-3 rolls, Depending on many you need to make)
Cut each of the hot dogs into thirds
Diagonally cut the crescent rolls to double the amount
Roll each Hot Dog into the Crescent Roll and bake according to directions
*You can add cheese too
Cost: $4.75
Crescent Rolls (Pillsbury 3 for $1.25 w/coupon)
Hot Dogs (Oscar Meyer 2 for $3.50 with coupon)
Popcorn
If you choose to have popcorn, there are many different ways you could go about this! Of course, you could buy a few boxes of popcorn and pop each individual bag, which could be time consuming, and a bit pricey. Or, you can did like we did, and go back to Dollar Tree(my favorite party supply store!) and buy 2 large prepopped bags for just a $1.00 each! While I was there, I also found 6 packs of popcorn containers for each guest to have their own!
Cost: $4.00
2 bags Popcorn ($1.00 each at Dollar Tree)
2 6pks. bags ($1.00 each at Dollar Tree)
 Candy Apples
Apples (7-10 apples) *purchased at produce stand, cheaper than supermarket.
caramel candies (1-2 bags individually wrapped candies)
1/4 cup milk
candy sticks *Candy Sticks and Caramel candies purchased at Dollar Tree
parchment paper
This is another great recipe that can be made at home! To all of the moms out there that own a Crock Pot...this is the perfect time to grab it! First, wash the apples and stick a candy stick in the bottom. Line a baking sheet with parchment paper. Turn your crock pot on Low, and start to individually unwrap the caramel into the pot. When all candies are in, add 1/4 cup of milk. Leave in Crock Pot for about an hour, stirring occassionally. If the consistancy is too thick, mix in just a small amount of milk and stir to create a creamier consistancy. When candy has melted, dip apples in caramel, and set to cool on parchment paper.
*For a special touch roll the apple, while still wet,into chocolate chips, nuts, sprinkles, etc.
Cost: $5.89
Apples $3.89 for 7 small apples
Candy sticks $1.00 for 25 pack
Caramel candy $1.00 per bag
If you want to go all out for your carnival theme, you can rent carnival items from your local rental center, such as, old fashioned popcorn machines, cotton candy rentals, even snow cones!
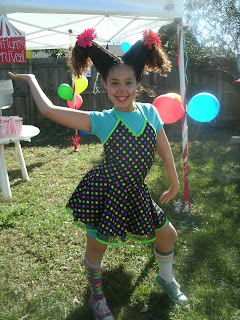
Another great addition to a Carnival party is a Clown! Of course, you can rent a clown to come to your party for a few hundred dollars or, you can ask a close friend or neighbor to help out for the day! In my case, my oldest daughter volunteered to dress up! Awesome! I dug through her closet and pulled out the brightest, most unmatched outfit I could find! After she was dressed, I added some colorful face paint and wildly crazy hair....Voila! Introducing "Giggles" The Clown!
 Be back tomorrow with some tips and games for a great Carnival Party!
*Check me out on Facebook at facebook.com/TheThriftyCraftyMom

Corn Dogs aka (Pigs in a Blanket) (32-48 servings)
Crescent Rolls (2-3 rolls, Depending on many you need to make)
Hot Dogs (2-3 rolls, Depending on many you need to make)
Cut each of the hot dogs into thirds
Diagonally cut the crescent rolls to double the amount
Roll each Hot Dog into the Crescent Roll and bake according to directions
*You can add cheese too
Cost: $4.75
Crescent Rolls (Pillsbury 3 for $1.25 w/coupon)
Hot Dogs (Oscar Meyer 2 for $3.50 with coupon)
Popcorn
If you choose to have popcorn, there are many different ways you could go about this! Of course, you could buy a few boxes of popcorn and pop each individual bag, which could be time consuming, and a bit pricey. Or, you can did like we did, and go back to Dollar Tree(my favorite party supply store!) and buy 2 large prepopped bags for just a $1.00 each! While I was there, I also found 6 packs of popcorn containers for each guest to have their own!
Cost: $4.00
2 bags Popcorn ($1.00 each at Dollar Tree)
2 6pks. bags ($1.00 each at Dollar Tree)

Apples (7-10 apples) *purchased at produce stand, cheaper than supermarket.
caramel candies (1-2 bags individually wrapped candies)
1/4 cup milk
candy sticks *Candy Sticks and Caramel candies purchased at Dollar Tree
parchment paper
This is another great recipe that can be made at home! To all of the moms out there that own a Crock Pot...this is the perfect time to grab it! First, wash the apples and stick a candy stick in the bottom. Line a baking sheet with parchment paper. Turn your crock pot on Low, and start to individually unwrap the caramel into the pot. When all candies are in, add 1/4 cup of milk. Leave in Crock Pot for about an hour, stirring occassionally. If the consistancy is too thick, mix in just a small amount of milk and stir to create a creamier consistancy. When candy has melted, dip apples in caramel, and set to cool on parchment paper.
*For a special touch roll the apple, while still wet,into chocolate chips, nuts, sprinkles, etc.
Cost: $5.89
Apples $3.89 for 7 small apples
Candy sticks $1.00 for 25 pack
Caramel candy $1.00 per bag
If you want to go all out for your carnival theme, you can rent carnival items from your local rental center, such as, old fashioned popcorn machines, cotton candy rentals, even snow cones!
Another great addition to a Carnival party is a Clown! Of course, you can rent a clown to come to your party for a few hundred dollars or, you can ask a close friend or neighbor to help out for the day! In my case, my oldest daughter volunteered to dress up! Awesome! I dug through her closet and pulled out the brightest, most unmatched outfit I could find! After she was dressed, I added some colorful face paint and wildly crazy hair....Voila! Introducing "Giggles" The Clown!

*Check me out on Facebook at facebook.com/TheThriftyCraftyMom
Friday, January 6, 2012
Welcome Back! Today I’m going to sum up the Hollywood Fashion Show Birthday Bash! Our next task is to decide what the guests are going to do when they all arrive at the party? Pick activities that coordinate with your party theme, but also are activities that fun for everyone! In our case, we decided to stick with the fashion theme, and setup small stations with various activities for the girls to do! Our first station was setup like a small nail salon. I used a serving tray from my pantry, and pulled out all of our nail polishes and decals for each girl to choose her design. We also had a small nail file, nail polish remover and pads.

Our next station was devoted to makeup! We as mothers, always have a ton of makeup shoved in our drawers that we NEVER use! Pull out that old makeup, and let the girls go to town! I covered a table with another Dollar Tree plastic tablecloth and scattered the table with a variety of old makeup and brushes! I also purchased 4 small tabletop mirrors to place around the table, so each guest could see while doing her makeup…the mirrors were another Dollar Tree find, $4.00.

Again following our Hollywood Fashion Runway theme, I had my daughter collect her favorite CDs and boombox. We used a small side table on the back porch to setup the music! We also plugged in my daughters microphone from her karaoke machine and used it to announce each girl walking down the runway! I had earlier mentioned that I purchased small trophies for each guest to be judged on the runway…After the girls had a ball strutting their stuff back and forth down the runway for a good hour, we announced awards for certain categories such as Best Walk, Most Attitude, Best facial expressions, Most Talent, etc. while the girls danced on the dance floor under twinkling lights!

As a great decoration, I used an old clothing rack that I store in my garage, to hang an array of all the girls dressup and costume clothing…from dresses, to crowns, boas, gloves and jewelry! I hung everything up and set it up close to the runway, so each guest could grab something for their debut!

Thursday, January 5, 2012

Today I’m back with my first thrifty birthday party idea! For my daughter’s 11thbirthday, she wanted a theme that had a “grown up” feel to it. As for most girls, my daughters love to dress up in their best costumes, and parade around the house, singing and dancing! Incorporating things that your child enjoys doing, always helps with party themes and activities! We used those fun, playful ideas in coming up with a Hollywood Fashion Show Theme! My daughter was so excited, so we started planning right away! I always start brainstorming ideas, and special details that will really stand out and be remembered. I also browse online and in magazines. Our first thoughts for this fabulous Hollywood Fashion Show Party were to ask all of the girls to come Dressed to Impress, and expect a fun time dancing and walking a runway! My daughter also insisted the party be early evening, so it would be dark outside. Great! Let’s get started! I removed all furniture and toys from my back porch, and strung Christmas lights all over the ceiling….Voila! Instant Dance floor! Next step….Runway! I knew I needed something that was slightly elevated from the ground, and sturdy enough for the girls to walk on…we don’t want any accidents. We ended up borrowing 3 used wooden pallets and scraps of plywood from our neighbor’s yard, and lined them side by side down the backyard. Because the pallets weren’t solid, I used small nails to nail the plywood to the top of the pallets, creating a walkway. My next thought was that every runway has a red carpet!
 So I had a leftover red plastic rectangular tablecloth leftover from a previous birthday party and cut it in half…If you don’t already have a spare red tablecloth, lol, they are sold for $1.00 at your local Dollar Tree. I used half of the tablecloth and taped it down the Runway! It looked great! I own an archway that I thoughy would be a great source of light, at the end of the runway, if covered in lights and balloons! I used the other half of the red tablecloth to stretch from our front door, down the driveway, to create a red carpet for each of the party guests to walk down as they enter!
 Our next thought for the party was to have small appetizers and finger foods, prior to having cake and ice cream. I wanted to make this party as much of a “ grown up” environment as possible, so I used small snacks that most kids would enjoy, and they could eat with their fingers. I decided to make an assortment of peanut butter and jelly sandwiches, pressed in the shape of stars…to incorporate our Hollywood theme, using a cookie cutter. I also baked 3 Totinos pizzas, in variety of flavors, and cut them into small bite size pieces. I know that 3 doesn’t sound like a lot, but when you cut them up, it looks like a whole lot more! Our last tasty treat is one of my kids all time faves….pigs in blanket! It’s an oldie, but always a goody! I ended up with a large assortment of warm, delicious finger foods that all of the guests would be sure to love! My total spending on appetizer snacks was $8.47. You can’t beat that! I then asked my daughter what kind of cake she would like? She said she wanted to keep the bite size theme going and have cupcakes instead. Cupcakes! That’s , a piece of cake, lol. She wanted strawberry flavored cupcakes, with glaze, not frosting. I purchased the cake mix and glaze at my local Dollar Tree for a total of $2.00. I have a tiered cupcake stand that would perfect for blowing out the candles!
 Next, decorations! I looked online for some ideas, and decided to make the decorations myself! I used sturdy cardboard boxes, and painted Holywood themed pictures and words. For larger signs, i used the back side of wrapping paper, which is usually white, and used the kids alphabet stencils for the wording! After painting the signs, I used glitter and stars to make sure they dazzled in the sparkling lights! While I was at the Dollar Tree, I also found a variety of decorations, including small gift boxes to use as parting favors (on sale for 2/$1.00), small 6 pack bags of trophies to give to each party guest on the runway. They even had a wedding section with beautifully decorated paper plates, cups, napkins, balloons, crepe paper and cutlery. The cutlery was made out of plastic, but was silver, and looked just like real silverware! I even found 6 packs of small champagne glasses, in the thoughts of having a toast to the Birthday Girl! I also made placecards for each of the guests. The glasses made me start to wonder what type of drink the girls would be drinking at party….Punch!
I looked online for a non-alcoholic punch recipe. I found a super easy one that simply mixed together fruit punch and sherbet! How easy is that? So while at the Dollar store, I also picked a punch bowl and ladle. My total purchase at Dollar Tree was a whopping $21.40, including all decorations and cupcake mix! Wow! We’ll finish up this shindig tomorrow! Thanks for reading!
Thrifty Parties and Events
Hi everyone! My name is Candace, aka Thrifty Crafty Mom! I am starting this blog to inspire other Moms to use their creative side when planning parties or special events, to achieve a memory to remember forever! First, let me start off by telling you a little bit about myself. I live in the beautiful state of Florida, and I am a single Mom of 2 truly amazing little girls! They have inspired me to help other Moms to have fun with the materials that you already have, and use your imagination to make those special details be something to remember! There are so many shows on TV nowadays, throwing these elaborate birthday parties, and spending thousands upon thousands of dollars on decorations, cakes, dresses, cars, etc. and then we wonder why our kids come to us with these preplanned party themes, that would put our budgets through the roof! My daughters always have a theme in mind, and their own input for what they consider to be must-haves! As for any Mom, you always want to do the best you can for your child, and if that means that a little more effort has to be put into the party, in order for less to come out of your pocket…then let’s do it!
Tips
1. Always make a budget! Making a budget enables you to try to stay around a certain allotment of money, so it doesn’t end up costing you more money in the end. Having a great party, has nothing to do with how much money you have to spend. Having a great party means picking a theme, and sticking with it! And having as many details as possible!
Be back tomorrow with my daughter, Arianna’s 11th Hollywood Fashion Show Party! What a Hoot!
Subscribe to:
Posts (Atom)